前言 LaunchAnyWhere 从效果上可实现以 Setting APP 权限及 System 权限,发送任意 Intent 。如拨打电话,发送短信等,也可以启动各种未导出的 Activity ,如设置锁屏密码,可以突破进程间组件访问隔离的限制。可影响安卓2.3-4.3的系统。这种类型的漏洞后来被谷歌称为 Intent Redirection 。
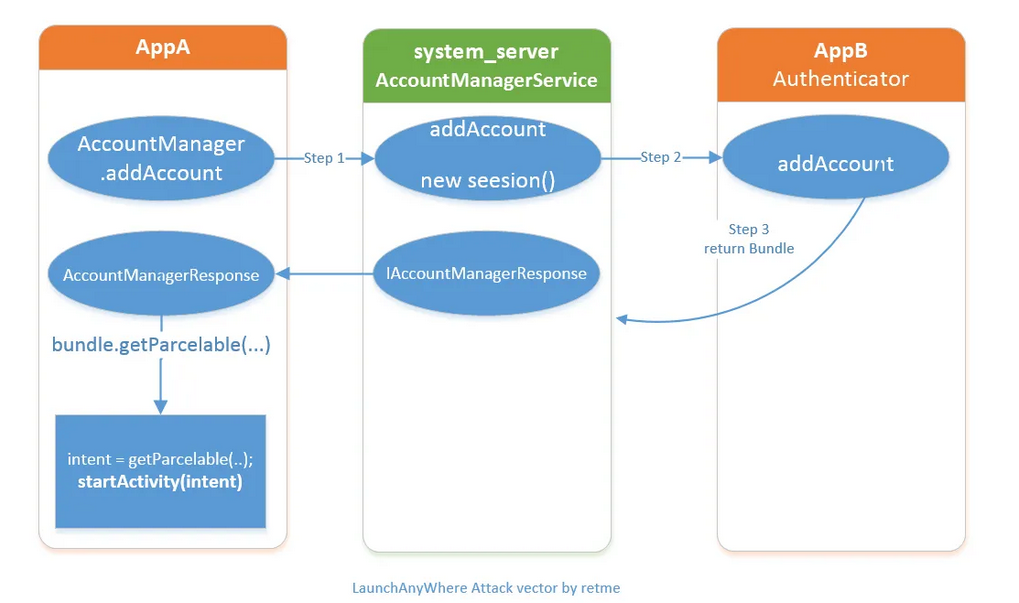
漏洞分析 问题出在 AccountManagerService 里,这是安卓的系统服务之一,主要负责账户、密码和授权的集中管理。对外暴露了接口 AccountManager 给开发者。正常应用场景如下:普通应用(APPA)去请求添加某账户时,会调用 AccountManager.addAccount ,该方法用于创建账户,然后 AccountManager 会去查找提供账号的应用(AppB)的 Authenticator 类,调用对应APP的 Authenticator. addAccount 方法,AppB将返回一个Bundle ,AppA再根据AppB返回的 Bundle 提取 Intent 去调起AppB的账户登录界面。 AccountManagerService 负责其中中间通信 。
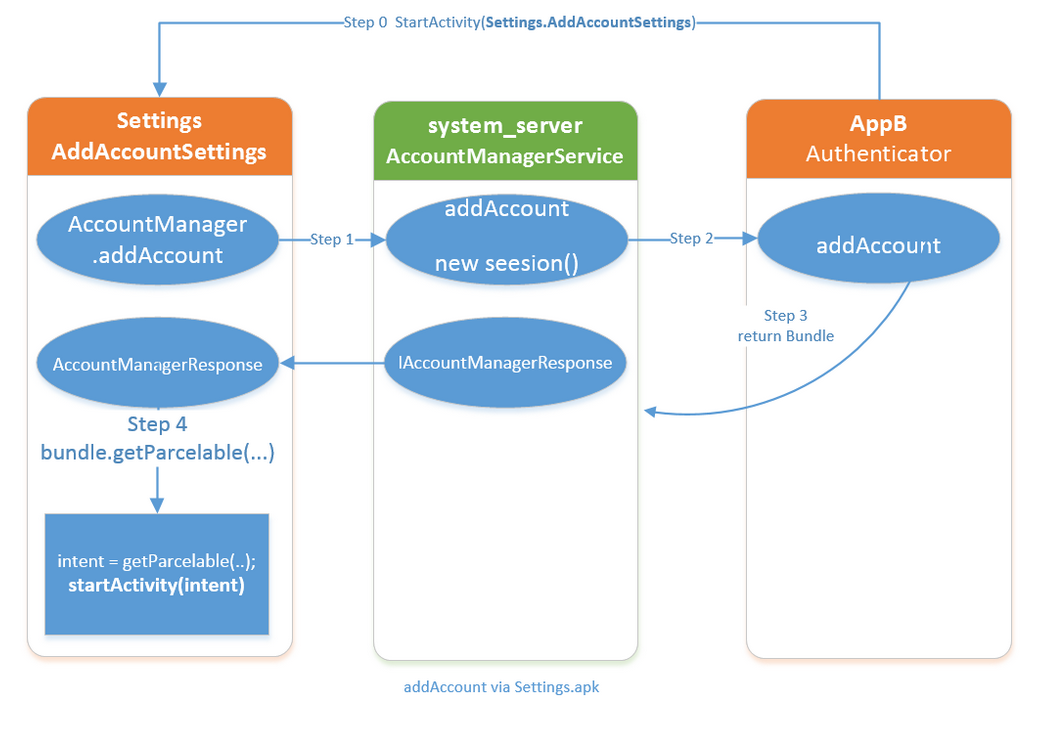
这里的本意是帮助APPA去找到APPB的登陆页面,并打开这个页面。但是APPB返回的 Bundle 可以由APPB控制,同时相关代码中并没有对 Activity 的合法性进行检查,那么APPA启动的 Activity 就可以被控制。此时假如APPA是一个 system 权限的应用(如 Settings ),那么便可以启动各种未导出的 Activity 。
http://androidxref.com/4.3_r2.1/xref/frameworks/base/services/java/com/android/server/accounts/AccountManagerService.java
1
2
3
4
5
6
7
8
9
10
11
12
13
14
15
16
17
18
19
20
21
22
23
24
25
26
27
28
29
30
31
32
33
34
35
36
37
38
39
40
41
42
43
44
45
public void onResult (Bundle result) { mNumResults++; if (result != null && !TextUtils.isEmpty(result.getString(AccountManager.KEY_AUTHTOKEN))) { String accountName = result.getString(AccountManager.KEY_ACCOUNT_NAME); String accountType = result.getString(AccountManager.KEY_ACCOUNT_TYPE); if (!TextUtils.isEmpty(accountName) && !TextUtils.isEmpty(accountType)) { Account account = new Account (accountName, accountType); cancelNotification(getSigninRequiredNotificationId(mAccounts, account), new UserHandle (mAccounts.userId)); } } IAccountManagerResponse response; if (mExpectActivityLaunch && result != null && result.containsKey(AccountManager.KEY_INTENT)) { response = mResponse; } else { response = getResponseAndClose(); } if (response != null ) { try { if (result == null ) { if (Log.isLoggable(TAG, Log.VERBOSE)) { Log.v(TAG, getClass().getSimpleName() + " calling onError() on response " + response); } response.onError(AccountManager.ERROR_CODE_INVALID_RESPONSE, "null bundle returned" ); } else { if (mStripAuthTokenFromResult) { result.remove(AccountManager.KEY_AUTHTOKEN); } if (Log.isLoggable(TAG, Log.VERBOSE)) { Log.v(TAG, getClass().getSimpleName() + " calling onResult() on response " + response); } response.onResult(result); } } catch (RemoteException e) { if (Log.isLoggable(TAG, Log.VERBOSE)) { Log.v(TAG, "failure while notifying response" , e); } } } }
https://android.googlesource.com/platform/packages/apps/Settings/+/refs/tags/android-4.3_r3/src/com/android/settings/accounts/AddAccountSettings.java
1
2
3
4
5
6
7
8
9
10
11
12
13
14
15
16
17
18
19
20
21
22
23
24
25
26
27
28
29
30
31
32
33
34
35
36
37
private final AccountManagerCallback<Bundle> mCallback = new AccountManagerCallback <Bundle>() { @Override public void run (AccountManagerFuture<Bundle> future) { boolean done = true ; try { Bundle bundle = future.getResult(); Intent intent = (Intent) bundle.get(AccountManager.KEY_INTENT); if (intent != null ) { done = false ; Bundle addAccountOptions = new Bundle (); addAccountOptions.putParcelable(KEY_CALLER_IDENTITY, mPendingIntent); addAccountOptions.putBoolean(EXTRA_HAS_MULTIPLE_USERS, Utils.hasMultipleUsers(AddAccountSettings.this )); intent.putExtras(addAccountOptions); startActivityForResult(intent, ADD_ACCOUNT_REQUEST); } else { setResult(RESULT_OK); if (mPendingIntent != null ) { mPendingIntent.cancel(); mPendingIntent = null ; } } if (Log.isLoggable(TAG, Log.VERBOSE)) Log.v(TAG, "account added: " + bundle); } catch (OperationCanceledException e) { if (Log.isLoggable(TAG, Log.VERBOSE)) Log.v(TAG, "addAccount was canceled" ); } catch (IOException e) { if (Log.isLoggable(TAG, Log.VERBOSE)) Log.v(TAG, "addAccount failed: " + e); } catch (AuthenticatorException e) { if (Log.isLoggable(TAG, Log.VERBOSE)) Log.v(TAG, "addAccount failed: " + e); } finally { if (done) { finish(); } } } };
漏洞利用 网上有很多exp这里就不详细分析了。大概思路就是注册一个基于 Service 的 MyAccountService 去满足能够提供账户授权的需求,从而可以控制返回的 Bundle 。同时这个APP自己调用 com.android.settings.accounts.AddAccountSettings 去触发 Settings 的 addAcount 从而触发 LaunchAnyWhere 。
https://github.com/fxc233/android-vul-exp/tree/main/LaunchAnyWhere
补丁分析 使用 pm.checkSignatures 检查两个 UID 对应的签名是否匹配,从而判断返回的 intent 是否是合法的。
https://android.googlesource.com/platform/frameworks/base/+/5bab9da%5E%21/#F0
1
2
3
4
5
6
7
8
9
10
11
12
13
14
15
16
17
18
19
20
21
22
23
24
25
26
27
28
29
30
31
32
+ @Override public void onResult (Bundle result) { mNumResults++; - if (result != null && !TextUtils.isEmpty(result.getString(AccountManager.KEY_AUTHTOKEN))) { + Intent intent = null ; + if (result != null + && (intent = result.getParcelable(AccountManager.KEY_INTENT)) != null ) { + + PackageManager pm = mContext.getPackageManager(); + ResolveInfo resolveInfo = pm.resolveActivity(intent, 0 ); + int targetUid = resolveInfo.activityInfo.applicationInfo.uid; + int authenticatorUid = Binder.getCallingUid(); + if (PackageManager.SIGNATURE_MATCH != + pm.checkSignatures(authenticatorUid, targetUid)) { + throw new SecurityException ( + "Activity to be started with KEY_INTENT must " + + "share Authenticator's signatures" ); + } + } + if (result != null + && !TextUtils.isEmpty(result.getString(AccountManager.KEY_AUTHTOKEN))) { String accountName = result.getString(AccountManager.KEY_ACCOUNT_NAME); String accountType = result.getString(AccountManager.KEY_ACCOUNT_TYPE); if (!TextUtils.isEmpty(accountName) && !TextUtils.isEmpty(accountType)) { @@ -2223 ,6 +2276 ,7 @@ super (looper); }
参考链接 https://xuanxuanblingbling.github.io/ctf/android/2024/04/13/launchanywhere01/
https://blog.lleavesg.top/article/LaunchAnyWhere
http://retme.net/index.php/2014/08/20/launchAnyWhere.html